


Destination Yellowstone
Yellowstone National Park was the first major photography destination for me shortly after I started this amazing journey in 2008. The plan was to drive across the United States, from New York to Wyoming and photograph everything along the way. So, in 2010, being the greenhorn I was, I packed up my camera and my 3 kit lenses, new tripod, rented a car, and hit the road. Boy was I in for a rude awakening.
The Gear NOT for Yellowstone
My skills were far from honed seeing that I just got into this photography thing. As with a lot of learning I did a ton of studying and thought I was ready. But clearly, I would find out otherwise.
In my bag at the time was a Sony A200 DSLR, a 10.2 megapixel beast that you can buy today for just 179.00. Yes, that is correct, there was a time that Sony made a moving mirror camera, albeit a rebranded Minolta as far as I could tell. It was all I could afford and looking back I am kind of glad I didn’t have the greatest equipment to start on. It definitely taught me through adversity. The camera’s specs were weak but it did have in camera stabilization that still was not all that great. Minimum ISO was 100 and anyone who knows older Sony Cameras also knows they were noise monsters even at ISO100. For lenses, all I had at the time were: a Sigma 10-20mm f4.6/5.6, a Sony 70-300 f4-5.6 kit lens, this weird Tamron Zoom lens and a Sigma 50mm 1.4. The Sigma 50mm is actually a nice lens and ended up being my lifesaver in the end. There will be more on that later. I had been using the Sigma 10-20 for just about everything around here. 10mm look killer for waterfalls and indoor abandon scenes and the 20mm end gave me just enough reach for big landscapes. I was ready and set for the big trip!
The Let Down
It’s August 21, 2010 and we were up at 6am to drove to a spot where I had calculated the sun would light up the Grand Teton at sunrise. It was still a bit dark so setup was by headlight. Having found the location I desired, I got my camera, Sigma 10-20mm, tripod all set up and ready to go. We were at the edge of a small cliff facing the Grand Teton range. I did have to wait until first light to get focus…so we waited. The sun popped it’s head over the horizon so I took to my camera and peered through the viewfinder to get my focus and….
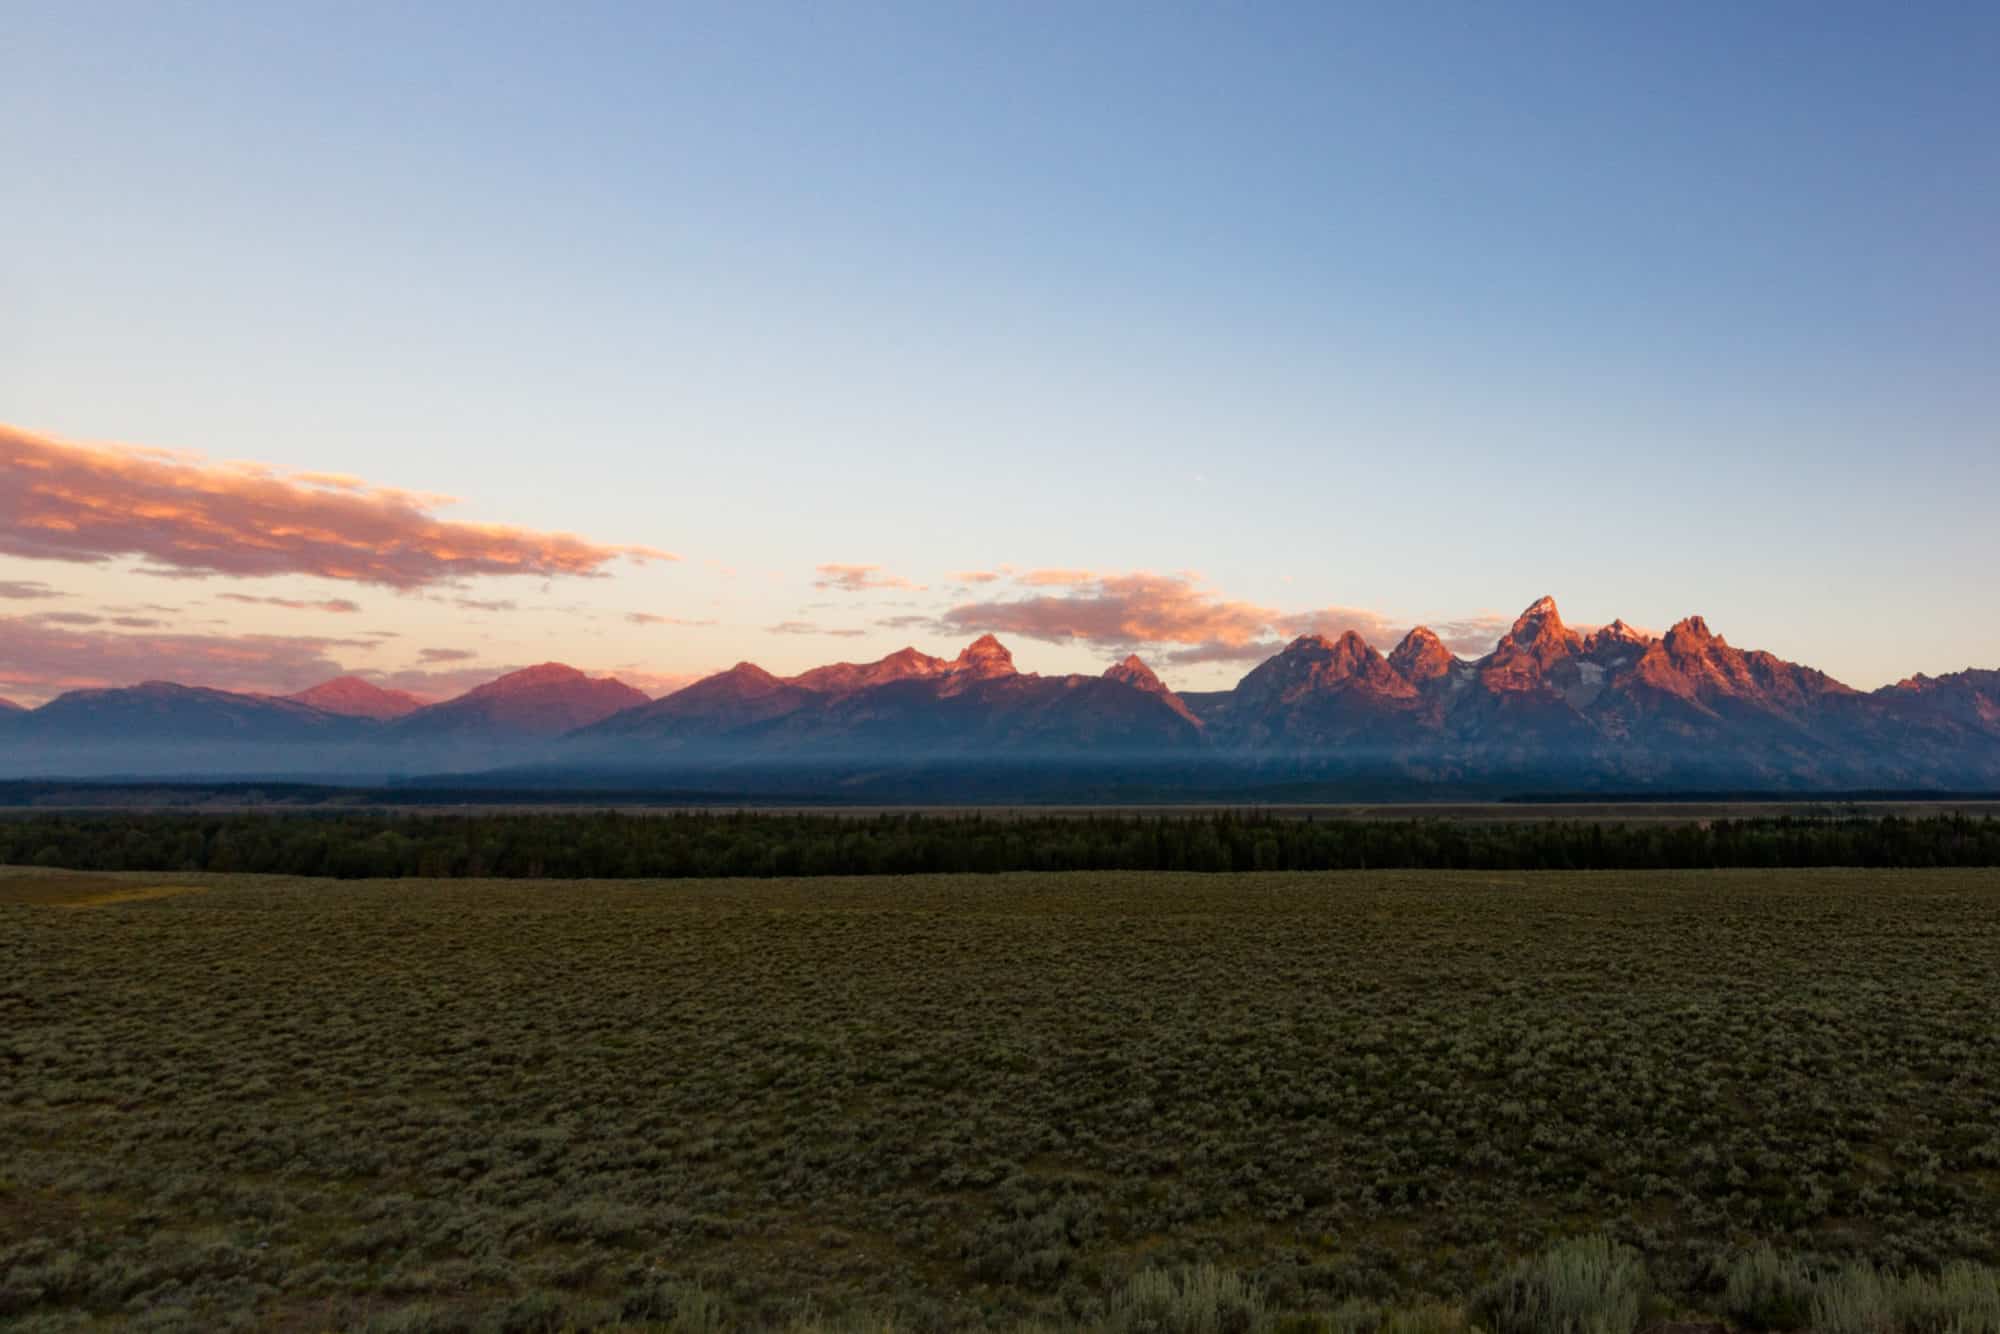
I remember my exact thought….”Where are the mountains?” As they seemed so small in camera compared to what I was seeing. “Why is it so soft?” and “What am I doing here?” also came to mind. Today, when I look at this scene, and critique my “green self”, I think that I definitely did not know what I was doing with composition. I had the time of day right and the spot was perfect. Even though I thought I was prepared for this level of photography, I was not. But, I adapted on the spot, as a result of sheer panic mind you. Traveling 12 days, spending all this money, thinking I was ready, and pfffffffft. I was not going to fail.
So, I dug through my back as quick as I could to find that Sigma 50mm 1.4 which was easily the best lens I had at the time. I slapped it on and it got me this close.
Even though that was better, my camera was really showing it’s inadequacies at this point. Noise and softness were the issue. It didn’t help that I forgot my camera was in ISO200, adding unneeded noise to the shot. It is worth noting too, that this camera was a crop sensor. So you need to multiply each of these lenses focal length by 1.5 to get their true length on this camera body. The 10-20mm was actually a 15-30mm and the 50 was a 75! Unfortunately, at this spot I really needed was a real 50mm on the crop which would have been a 30mm lens-ish.
At the time, I had no idea about crop sensors vs. full-frame sensors and chances are, if you are a beginner, neither do you. And this is okay. Just shoot, experience, look at your results and learn what works and what doesn’t. To me, numbers, specs, etc, mean nothing without experience. That’s true in the other direction as well. You will learn your equipment (and those numbers) through experience in the field and that is an okay approach as well. This type of approach is one that I have always preferred. Either path you decide to take, doesn’t matter as much as actually doing it. Less thinking about it, and more doing it.
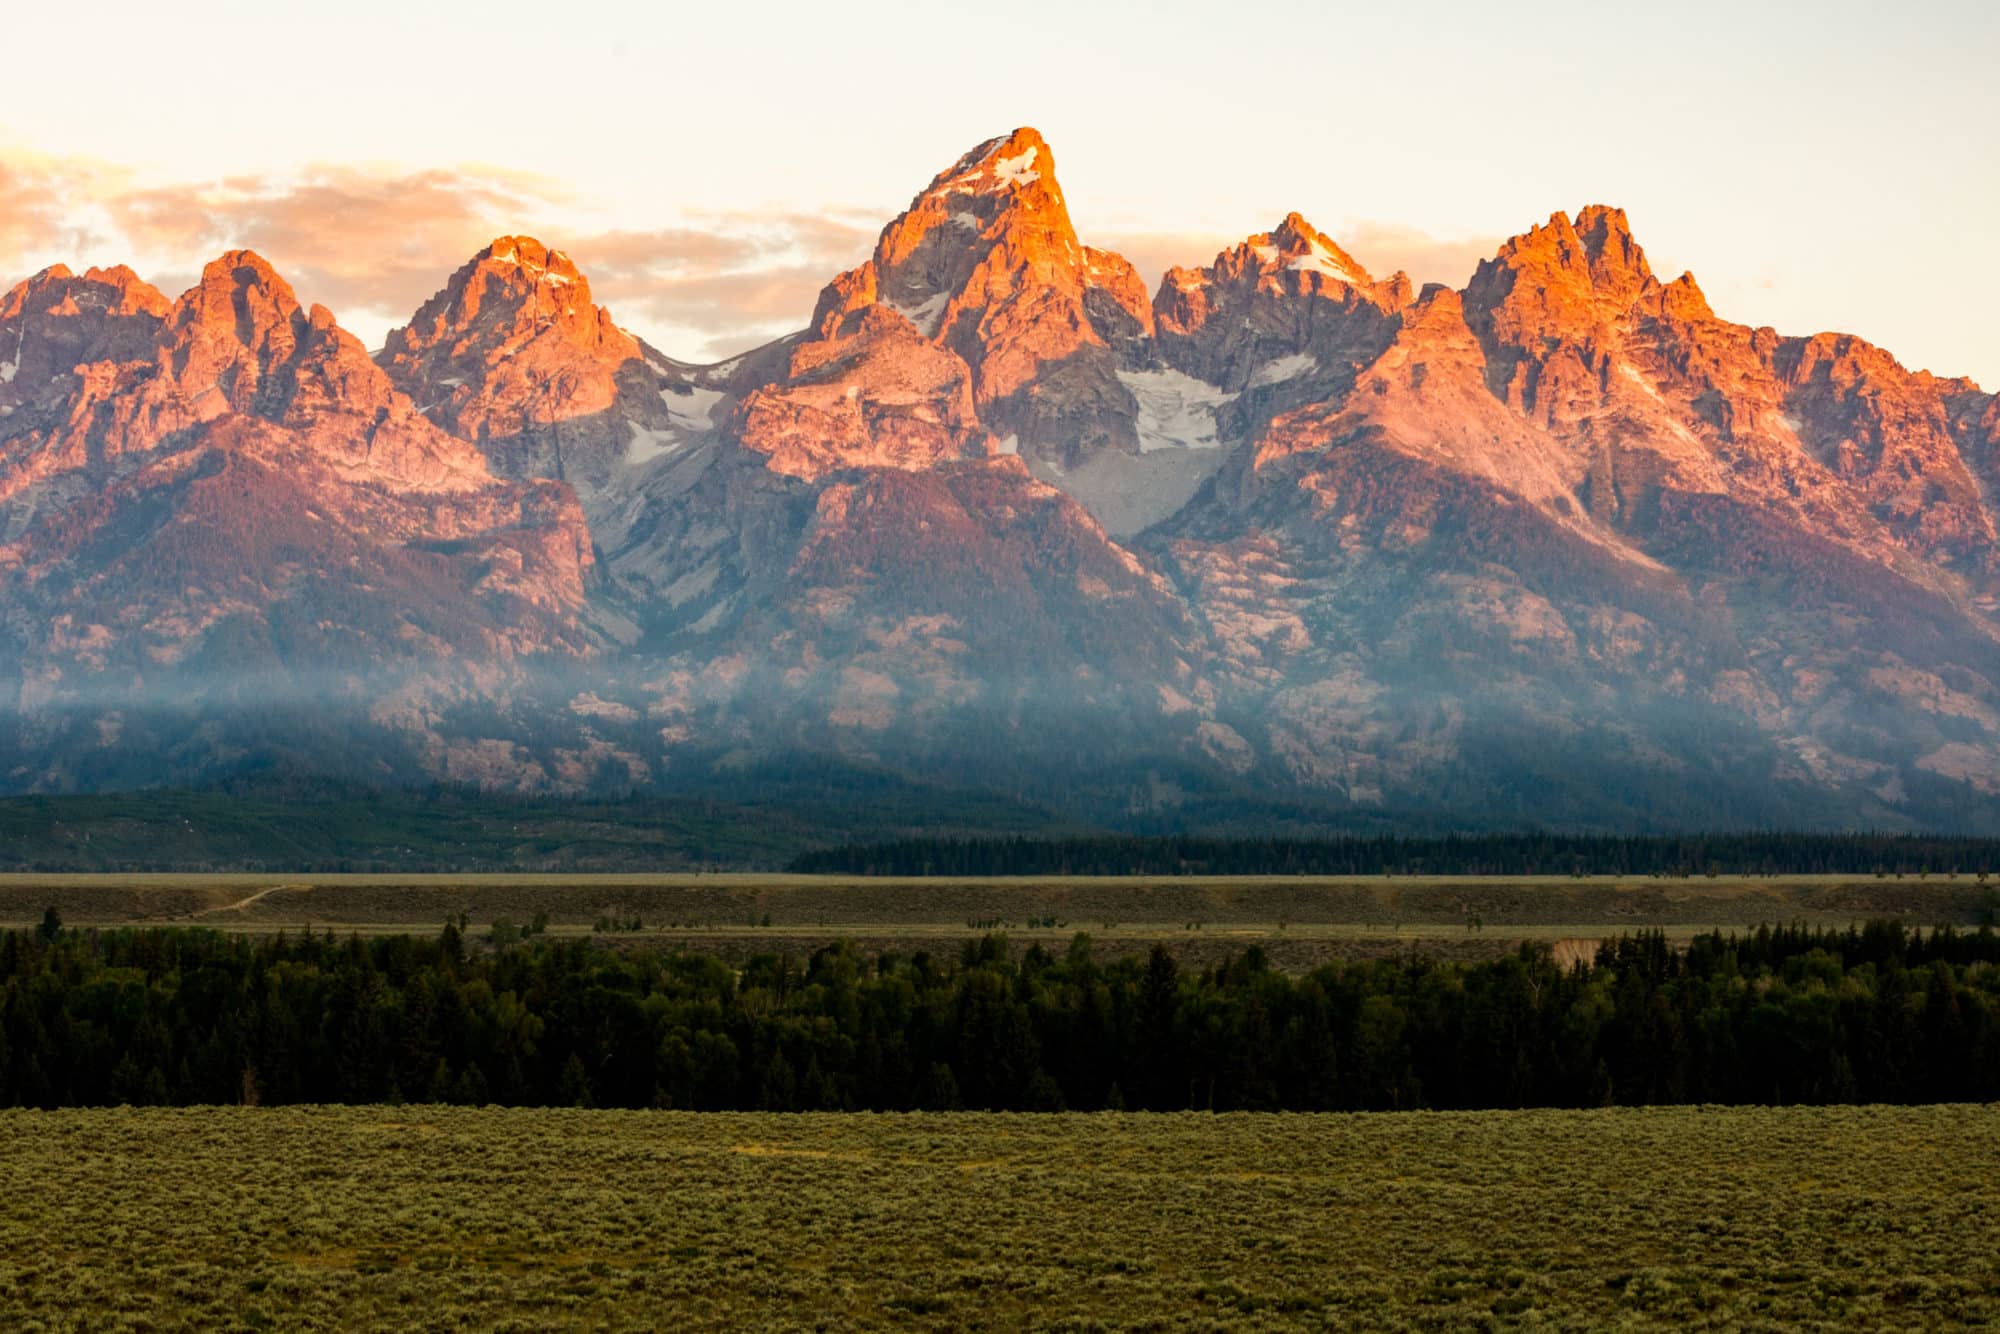
I ended up learning how to make big panoramas that day. Essentially, making up for my lens miscalculation. Nevertheless, quick thinking on my part to turn the camera to portrait mode and use the 50mm to shoot many frames in sections, then stitch them all together, led to this final image.

And of the 10,131 photos I took during this 12 day trip. This is just 1 of about 5 full landscapes that I have released. The others were either not worth releasing or all out failures. Salvaged from the trip though, is the series I call “Colors of Yellowstone”. A macro mini series of photos that feature close-up photos of geysers, bacterial pools, and interesting textures from the park. Yellowstone is a very diverse biosphere of colors, creatures, and alien landscapes you just don’t see every day. Out of all the photos that I took, these rose to the top, luckily. If not for those photos, this trip might have been a complete bust otherwise.
Geysers, Pools, and Slime Mold Oh My!
The pools in Yellowstone are boiling hot, thus giving way to crazy bacterial life. This bacteria comes in many forms and colors. One one spot you may find the water and ground alien green.

Where in other spots it may be azure blue.

And in other parts of the park you will find various shades of blood red growth. It really is stunning and captivating.

These micro worlds are truly glimpses into the beginnings of life on our planet. Regardless of how fascinating and wildly colorful it is, the constant reminder of the deadliness that is Yellowstone is always there. Heat, steam, and boiling water gurgling from deep within the Earth can be experienced everywhere in the park. The sulphuric fumes that hit you immediately upon entering the park give warning signs of what is beneath your feet. You can look at the big picture in Yellowstone, and I will be during my return trip this year. (you can follow that on my facebook, instagram, and twitter pages) But, Yellowstone National Park holds many small worlds that can be just as, if not even more exciting to photograph.
I am returning to Yellowstone in August of this year with my goal being the BIG Yellowstone and surrounding areas. If not for having a score I have to settle it would be hard to hold myself back from the small worlds. Although I am sure the park will have something new to teach me, this time I have the equipment and knowledge to get the job right. 🙂
You can subscribe to my blog here at the bottom of the page to get notified of my latest Yellowstone shots and stories coming in August. Until then, here is a slideshow of my “Colors of Yellowstone” gallery. (Click any photo in the slideshow to see the BIG gallery)
Be safe out there and stay creative!
~AD


2 comments